How to Delete Files on SD Card in Windows
I know the frustrating feeling that comes with dealing with difficult files that have refused to be deleted from SD cards. This is the point where you just have to bring in the big guns. And by that, I mean your Windows PC of course. In this article I will take you through the step-by-step processes on how to erase data on an SD card in Windows
3 Tips Before Deleting Files on SD Card
Rather than jumping headfirst as most amateurs do – something they often regret – take a moment to do it like a pro. Check out these three tips to avoid making an expensive mistake that you may lead to that unsavory emotion called regret.
What Does Deleting Files on SD Card Mean?
For most people when you erase a file on your SD card, it seems like you have removed it from the space. However, in reality, you have only given the computer permission to let other new data occupy the space the deleted file currently occupies. You also lose access to the location of said file.
Consider If you Need to Clear SD Card Data
When most people decide to erase data from their memory card, it is usually due to the following reasons:
- Free up Space: Memory space on SD cards are usually limited. Hence, when you reach a certain point, you just have to remove some files to make rooms for new ones.
- Remove Malware: When your memory cards become infected with malware and toxic programs, you might not be left with much choice than to erase the memory card, to get rid of the malware.
- Correct Errors: Your SD card might start malfunctioning due to errors or data corruption. Removing corrupted files is the way to fix this. In worse cases, you have to erase the entire card memory.
- Protect Your Privacy: You might want to give the memory card to a friend or a relative. Perhaps, you need to share some files on the memory card with colleagues - it would be wise to erase personal data to protect your privacy.
If you fall into any of the above categories, then you are in the right place, and clearing your SD Card Data is the correct step to take.
How to Protect Data When Deleting Files on SD Card Files
If you are deleting files on your SD card, there is always a legitimate concern about protecting the rest of the data on the card. To do this, you can easily copy out vital files you don't want to tamper with on your PC, or the cloud. You can then move them back on the SD card once you finish.
Regardless, you should take your time when deleting files, to ensure you don't remove important files by mistake.
3 Easy Ways to Delete Files on SD Card in Windows
Now let us dive into the crux of the matter. The following methods are the most comfortable and most efficient ways to remove unwanted data on your SD Card:
Way 1. Use "Del" Shortcuts
1. Press "Delete" on the Keyboard
- Put your memory card into its memory card "adapter" and plug it into your PC.

- Open Windows file Explorer. You can do this by searching out and clicking on the "file explorer" icon in the search menu. Or press [Windows + E] on your keyboard.
- Open the "My PC" or "Computer" folder. The icon resembles a desktop set-up. Click on the icon to open the folder.

- Find your SD card folder. Once you open the "My PC folder", you will find the SD card under the section "Devices and drivers".
- Open the SD card folder and highlight the file you want to delete by "left-clicking" on it once.
- Click on the "delete" key. You will usually find the key around the top right corner of your keyboard.
- Once you press the delete key, you will get a prompt – asking to confirm the action. Click on "yes" to confirm the permanent removal of the file.

2. Hold "Shift + Delete":
After "Step 4" above. Hold down the "shift" and "delete key", to bypass the confirmation prompt. And permanently delete the file.

3. Right-Click Delete
- Locate your SD card files under "My PC."
- Open your SD card folder and locate the file you want to delete.
- Right-Click on the file. You will get an options list to choose from.
- Find "Delete" under the list of options and click on it.

- You will get a prompt – asking to confirm the action. Click on "yes" to confirm the permanent removal of the file.
Way 2. Use Diskpart
Diskpart is a windows utility tool similar to a "command prompt" or power shell that you can use to access drives and disks on your computer. Using this method can seem a little technical. But it is a really easy tool to use. Just follow the following steps carefully.
- Open "Diskpart". Enter "diskpart" into the Cortana search bar. Click on the diskpart program to run it.

- Type "list disk" on the cursor prompt. This will bring you a list of disks and drives currently available on your Windows computer.
- Note the number used to indicate your SD card. On the next line of the cursor prompt. Type in "select + (whatever name your SD card was indicated with)". For example, if your SD card was indicated with "Disk 2". What you will type in would be "select disk 2".
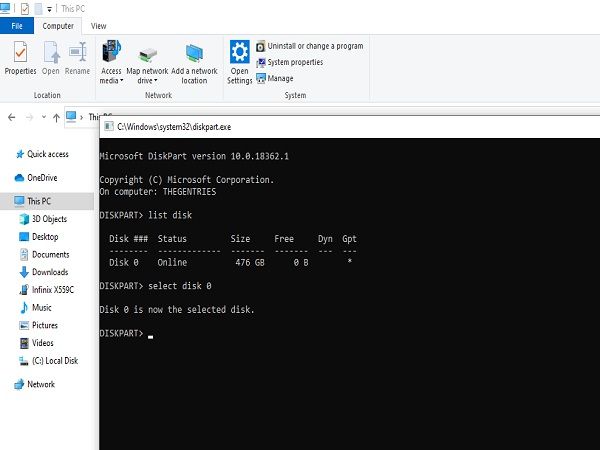
- Identify your SD card. Make sure you have selected the proper disk. You can use the difference in the size of the disks listed to identify your SD card.
- Type "clean" to erase the memory card. Click on the "Enter" key to complete the process. When the process is completed, you should get a message that reads, "Diskpart succeeded in cleaning the disk."

Way 3. Format SD Card
If what you are looking to do is to completely erase the SD card, formatting the SD card is the way to go. To format your memory card, follow the steps highlighted below:
- Open "Windows Explorer": Holding down "windows + E" keys. Or simply enter "Windows Explorer" into Cortana's search bar. And click on the icon.
- Open "This PC" or "My PC" folder. The folder usually has an icon with a symbol of a desktop computer.
- Find your SD card folder. Once you open the "This PC" folder, you should see a section named "Devices and Drives." Expand it, and you should find your memory card drive there.

- Right-click on your memory card drive. When you do this, you get a list of actions you can perform on the drive. Scroll down and look for the "format" option.
- Click on the Format option. A confirmation prompt might appear. Give permission to format the memory card. And the card should be wiped clean.

3 Issues When Deleting Data on SD Card in Windows
We know that it is not merely enough to show you how to erase files on your micro SD card. Several different things can go wrong, which can lead to frustration – while trying to delete files on memory cards.
The first thing to attempt if you run into any particularly tricky issue is to restart your PC. This can solve the majority of the problems. However, in this section, we will go through the most common issues you might face when deleting data on your SD card using your PC. And how to solve them.
Issue 1: SD Card Showing "No Permission to Delete"
You will get the "no permission to delete" error when you try to edit or alter any file on your SD card in windows that you don't have permission to write on it. And this is usually due to two different reasons. You should check out each one to be certain.
Reason 1: SD Card is Locked Physically.
The SD card adapter has a physical lock located on the side of its side. If the lock is on, you will be unable to alter the information on the SD card. Follow the next steps to unlock your SD Card.
- Eject the SD card. Right-click on the SD card to find the option to eject it. Click on it. To safely remove the SD card.

- Find the lock/switch (Note: not all SD card adapters have a lock). Turn your adapter on its side and look for the lock. It usually bears a marker right beside it that indicates both the "lock" direction and the "unlock" direction.

- Unlock your SD card adapter. Draw the switch towards the "unlock" direction to enable "write permission."
- Insert the card back into your PC. If this were the problem, you should be able to erase your files from the memory card. If not, try the next solution.
Reason 2: Permission to edit the SD Card is revoked.
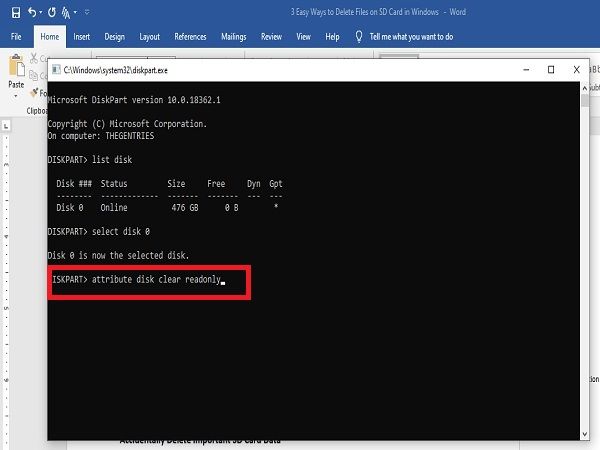
In order fix this, you have to remove the write protection with your PC utility tools. Using "diskpart." Follow the next steps to remove write protection from your SD card using "diskpart":
- Open "run" on windows. To open the "run" program, press "windows + R" on your keyboard.
- Type in "diskpart" into the prompt bar and click on "OK" or simply press the "Enter" key to open diskpart.

- Select your memory card disk.
- Once you open diskpart, enter "list disk" to see all the disks and drives currently on your PC. You should be able to identify your SD card using its size. Type in "select + (whatever name your SD card was indicated with)." For example, if your SD card was indicated with "Disk 2". What you will type in would be "select disk 2".
- Remove "write permission" from the disk. Enter "attributes disk clear readonly" in the prompt to remove the write protection on the memory card.
Issue 2: Accidentally Delete Important SD Card Data
Regardless of the precaution, you might have taken during your process. You might still accidentally erase an important file. Well, fret not. There is a very efficient and easy to use software program that you can use to recover any lost file from your SD card. It is the Recoverit Data Recovery Software.
The program can retrieve practically any type of deleted document. From document files to videos. And it is compatible with the PC. Follow the steps below to recover your deleted files using Recoverit.
Step 1: Launch Recoverit.
The program is light in size and only takes a few seconds to download from the above button or official site. To launch the program, Open Cortana's search bar and enter "recoverit." Click on the Recoverit icon to launch.
Step 2: Select your SD card drive.
The beauty of the program is that it is so easy to use. Once you launch it, you will be able to see all the drives on your PC. You only just have to look for the driver indicator of your SD card. And then select it as the target location.

Step 3: Scan the SD card.
Click the "start" button on the lower right corner of your screen to start scanning. Regardless of the method, you used in removing your data files. Recoverit would still be able to access them.
It uses an advanced algorithm to trace the lost file path. And gives you access to recover the deleted data you need.

Step 4: Preview and Recover
Wait till the scanning is over. You will be provided with all the deleted files available for recovery. Preview the listed files to find the one you need. Once you do, click on the "recover" button. And save the recovered file to another location on your PC.
While the scanning is very thorough, it is just as fast. So, you can get back your deleted file and get back to other activities of the day.

Issue 3: Find SD Card Not Detected on Computer
Sometimes you might not be able to find the drive for your SD card in Windows. The following tips give the most practical solutions to more frequent causes.
Check if the Memory Card Adapter is Functional
You can do this by simply trying it out on a different PC. If you still don't find it there, you will need to get a new card adapter. On the bright side, they are often cheaply priced.
Remove the Write Protection on the SD Card
This can be both due to physical or software-based protection on your memory card. Refer to the section under "no permission to delete". The detailed steps to remove write protection are listed there.
Troubleshoot in Device Manager
- Open Device Manager. Open the device manager by Hold down the "windows + X" keys to open the device manager. This will bring you a list of options to choose from. Click on "Device Manager" to open it.
- Find your SD Card. Look under "drivers" to find your memory card under "Device Manager.
- Make sure that your SD Card is Enabled. When you find your SD card, right-click on it. You will see a list of options there. Together with either the "disable" or "enable" option. If you get an "enable" option, it means your SD card was previously disabled, so why can't you find it? To rectify this, simply click on "enable."
- Ensure that your SD card drive is updated. Right-click on your SD card icon, you will get an option to upgrade its drive. Connect your computer to an internet source and click on update.
3 Tips After Deleting Data on SD Card in Windows
You don't want to leave anything to chance. Time is scarce and cannot be recovered. It is best to make a final check once you are done erasing data on your SD card, to prevent wasting valuable time wondering where you got it wrong when errors turn up.
Check If You Have Erased the Data
You want to double-check that you have removed the unwanted files and data on your memory card before you eject it. The primary reason being some files are stubborn, especially ones that are corrupted. You may have thought you deleted them, but they will remain on the card.
When this happens, you should try a more efficient method of erasing the files—for instance, using the "diskpart" method.
Check If You Deleted the Right Files
It is always wise to see if what you have deleted is the right file. You could have mistaken it for another, and in the process, lose an important file. If this happens, you can easily use the Recoverit data recovery program to get your lost data.
Eject Safely
When you snatch the SD card adapter out of your PC, you risk damaging it. With essential files along with it. To avoid this, right-click on the SD card icon and click on "eject" from the options list. The windows will let you know if it is safe to remove the card.
Closing Words
This write-up has been thoroughly researched to provide you not only with the easiest but most efficient processes of how to clear a memory card. While removing unwanted files and data, be careful not to delete an important file. Take your time and remove files safely.
SD Card Recovery
- Recover Card Data
- Repair Card Errors


Eleanor Reed
staff Editor